Web Page Basics
Before starting ASP.NET web pages, it’s important to understand how the ASP.NET technology works. Basically, web pages are just text files, like word documents, that live on a computer in the sky called a web server. Only the text files in this case have special code in them that only the web server knows how to interpret. You can tell these files are different than normal documents because they end in funny extensions like .aspx and .htm instead of .doc. When you steer your web browser to a website like Google, your computer goes through a process of calling the server in the sky and requesting that it send over the requested web page, which might have a name like default.aspx, or login.html. The web server sends the requested text file to your computer over the Internet, and your web browser translates the file into the pretty text and graphics that you see on your computer screen.
So the process of creating a website using Visual Studio Express is basically just creating and organizing these special text files for a web server to use, and also creating any images or graphics that you want on your website. Then those files are sent up to a web server, called a “hosting provider” or “hoster”, who you pay to give your website a proper Internet address (or URL). When your website is up on the hoster, folks can visit your URL with their web browser, which will magically bring your web pages down to their computer, where they can enjoy your website. See how easy that is? Now let’s look at what goes into an ASP.NET web page, and what happens to it when a user requests to see it.
What’s an aspx file?
The main file extension used in ASP.NET web sites is .aspx. This means that if you want to create a new web page on your website, it will probably be named something like, “mypage.aspx”. So when someone wants to see that page in their web browser, they would go to your URL (or domain as it is sometimes called) and to that aspx page by typing something like this: www.mycoolwebsite.com/mypage.aspx.
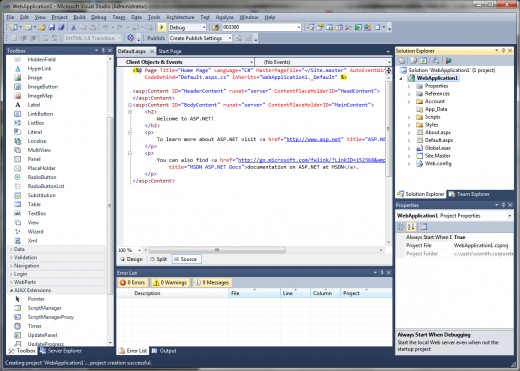
To see what goes into an aspx page, let’s open a new website project in Visual Studio Express. Once you have the project open, look on the right side of the screen at the Solution Explorer. You will see a bunch of files and folders listed in a tree structure, as shown in Figure 1.
When you visit an ASP.NET website, the page that comes up first is always default.aspx. (this can be changed, but that is a more advanced topic). Let’s look at default.aspx and see what is in it. Double click default.aspx in the Solution Explorer, and in the middle of the screen the contents of the file will show up as shown in Figure 1 above.
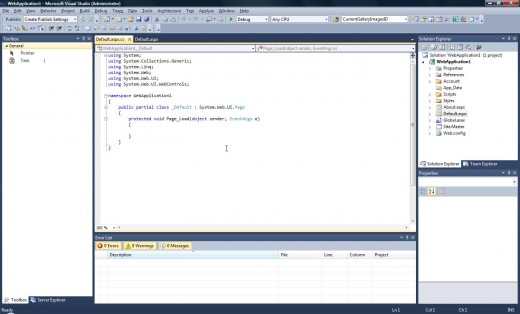
Now you have two files open at the same time in Visual Studio. They show up as two tabs in the center section of the screen as shown in Figure 2. But these two files are actually closely related. When a user requests your default.aspx file from the web server, this other file, default.aspx.cs, will be combined with it into one file. Then the web server will interpret these two files together, and create an invisible third file that it will send down to the user’s web browser. We won’t worry about that invisible third file right now. But let’s take a look at what is in this code-behind file (the .cs file).
Let’s concentrate on the bottom half of this file first. There are lots of curly brackets here. they look like this: { and } The thing to know about curly brackets in ASP.NET is that whatever text is inside of them goes together. They are used to group stuff.
Do you see the line that says, “protected void Page_Load(object sender, EventArgs e)”? This is called a method. Notice that there are a set of curly brackets after it. A method is a group of code that does something. When the web server tells a method to execute (or do it’s thing), everything in the curly brackets after the method name gets interpreted by the web server, and this can cause things to happen on the web page for the user. We will talk more about this later. For now, just know that this particular method, “Page_Load” gets executed once every time the web page is loaded or refreshed. So it is a useful place to put stuff that you want to happen when the page loads.
If this is starting to get confusing, don’t worry. We are about to add some stuff to the default.aspx web page and try it out. I think this will clarify a lot of things for you, and get you started on programming your own website.
Creating First Page
To get started, click on the default.aspx tab in the center window of the VS editor. Then highlight everything between the <asp:Content…> tag and the </asp:Content> tag and delete it. When you are done, your window should look like Figure 3.
Now, go over to the left side of the screen, and in the Toolbox find something called a “Label”. Drag it over to the editor in the middle of the screen and drop it on the empty line between the <asp:Content….> and </asp:Content>. If you don’t have an empty line available, make one by hitting Enter at the end of the <asp:Content…> line. Once it is there, replace this part, Text=”Label”, with this, Text=”Name: “.
Make another empty line below the Label, and type in this (without the quotes): <br />
Make another empty line.
Drag a Textbox from the Toolbox and place it on the empty line. Once it is there, change this part, ID=”Textbox1″ to this, ID=”txtName”.
Make another empty line below the Label, and type in this (without the quotes): <br />
Make another empty line.
Drag a Button from the Toolbox and place it on the empty line. Once it is there, change the ID to “btnGo” and the Text to “Go”.
Make another empty line below the Label, and type in this (without the quotes): <br />
Make another empty line.
Drag another Label from the Toolbox and drop it on the empty line. Once it is there, change the ID to “lblOutput” and the Text to “”.
When you are through, your editor should look exactly like Figure 4. If it does not, adjust it until it does. It is very important that everything look exactly right, except the spacing of things, that is really not important to this editor.
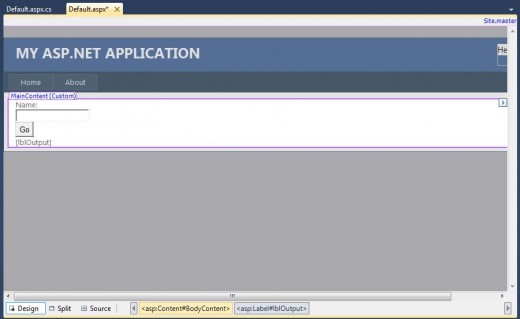
Once everything looks right, press the Design button in the bottom left corner of this window. The screen should change to look like Figure 5.
Now we’re getting somewhere. This is the editor’s representation of what your new screen is going to look like to the user. Now it’s not exactly right, because the editor is approximating the user’s browser, but it does give you a good idea of the progress that you have made.
Notice that there is a label that says “Name:”. You made that. Also there is a place to enter some text (your Textbox), a button that says “Go”, and another empty label. You placed all of that stuff on the screen back in the “source” tab of the editor. you can click back and forth to check it out. Pretty cool, huh? Each of these controls is on a different line because you put a line break between them in the editor. That was the <br /> part. If you wanted the Textbox on the same line as the name Label, you could simply delete the line break between them. Give that a try if you like.
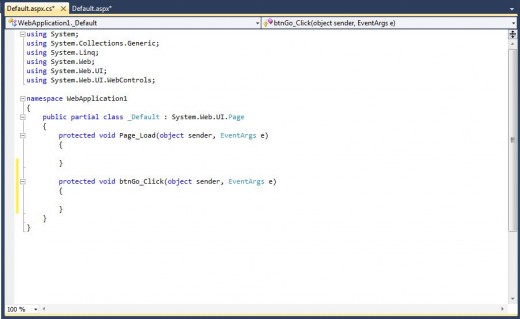
Now let’s make this web page do something fun. In the Design tab, double click on your “Go” button. That will open up default.aspx.cs automatically, and will add a method to the source code inside of it. It should look like Figure 6.
Notice the new method that was added to this source code file. It is called “btnGo_Click”. Whatever instructions we place in the curly brackets after this method name will be executed by the web server whenever a user clicks the Go button on the web page. The way this actually happens is that the whole page is sent back up to the web server from the web browser when the user presses the Go button. This is called a Postback, meaning the page is posted back to the server. The server gets an indication back with the page that says the Go button was pressed. So the server executes the code in the Go button Click method, and then sends the results back down to the web browser.
To see this in action, let’s add some code to this method. Add the lines of code in between the curly brackets of the btnGo_Click method as shown in Figure 7. Also add the single line of code to the Page_Load method. When you are done, ensure that your code in default.aspx.cs looks exactly like Figure 7.
So what exactly are we telling the web server to do here? Well, in the Page_Load method, we are saying to the web server that whenever it loads this page, whether it is the first time or a postback, we should blank out the lblOutput Label. Remember that the web server will run this code in the Page_Load method before it runs the code in the btnGo_Click method.In the btnGo_Click method, we are telling the web server that if the btnGo Button has been clicked, then check to see if the txtName Textbox has been filled in. “!=” means “not equal”, so the first line of code in the method says in plain English, “If the text that the user entered in the txtName TextBox is not equal to nothing” then do everything within the curly brackets immediately following the “if” statement. Otherwise, skip to the “else” set of curly brackets and do that stuff instead.
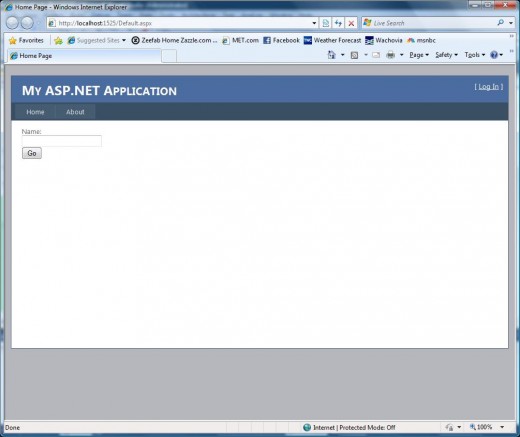
To see this code work, press F5. You can also press the little green arrow next to the word “Debug” in the toolbar, or you can go to the “Debug” menu item on top of the editor and choose the option “Start debugging”. When you do any one of these things, the Visual Studio Express compiler will convert your source files into special files that a web server can read. Then it will start up a web server on your local PC, and start up your web files in that server. Then it will open up a web browser so that you can see your files the same way a user would see them. All this will take a few minutes, so be patient. When Visual Studio has finished it’s work, you should see something like Figure 8.
There’s your new website, running in a web browser. Try pressing “Go” without entering anything into the TextBox. See how the message comes up below the button. Now enter your name in the TextBox and press “Go” again. Cool, huh?
So there you have it. You are now a web programmer, and have a good working knowledge of the basics of ASP.NET programming. Please feel free to play around with the code some more. As an exercise, add another Textbox, Label, and Button to the page to do something else.
- Second part of this post: How To Add Images into ASP Webpage (2)
- Last part: Using Menus in ASP.NET Development (3)
 Windows Hosting Blog – Seekdotnet.com Blog about Windows Hosting and ASP.NET Hosting
